Friday, December 27, 2013

Final Post

Wow what an amazing and exhausting experience this has been. I had so much fun with this project but I am glad it's over so I can take a break from baking (and eating) a little. By Christmas Eve, almost all the cookies were being stored in my grandma's previously empty fridge and freezer in her basement and they were filled to the top. I have never seen so many cookies in my entire life, it's actually insane.

Christmas Day we had two large platters of cookies filled with a few of each cookie. They were heavy trays. My cousin Kristin wanted all of our cousins to hold a cookie and take a picture with my mom and me holding a tray with all the cookies. My mom and I were standing, holding these heavy trays for a good 10 minutes waiting for the picture to be taken. I think I developed a little arm muscle within those 10 minutes so thanks cookies!


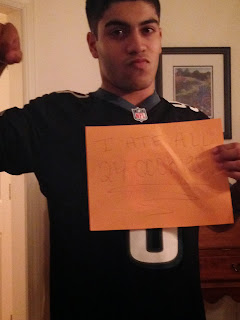
Here we all are! And if you zoom in really, really close on my arm you can see my muscle popping out... I'm just kidding with you! These are my lovely cousins, brother, and mama! Kristin came up with another great idea! She said we should have a 24 Club. Anyone who tries all 24 cookies gets to join the club. My mother and I, of course, already joined the ranks of that club but we didn't eat them all in one day. So that was the challenge presented. And one man came out victorious, my cousin Joey (the one in the Eagles jersey).

By 10:00 Christmas night, he had eaten 23 different cookies. The last cookie was at my grandma's house but he was not willing to give up so easily. So he and I drove to grandma's house and brought home all the cookies. He finished the last one and joined the prestigious 24 club. Congrats Joey!

And here's the picture to prove it! The sign isn't really visible but it says "I ATE ALL 24 COOKIES!" So there's your proof. I don't know how he did it but he did!

Yesterday, we still had the issue of cookie-filled freezer so we decided to make trays. We made them for our neighbors and some family.


Here they are all nine of them. And believe it or not we still have cookies left.... So if anyone is interested in some cookies, come visit the Burks household! We are trying to get rid of them!!!

Anyway, I wanted to give shout-out to my cousin Andrew for being such a great supporter of my blog, reading it every day! Thanks to all my friends and family who have supported us through this project, you're the best! Thanks to all of you who read my blog. I'm really glad everyone loved it and I hope at least someone got a good new recipe out of this!

Will we do it again next year? No, I have a new journey awaiting me but don't you worry, the Christmas cookie baking tradition will continue on for a long time.

Happy New Year! I hope 2014 brings you love and joy.

xoxo, Marissa

Tuesday, December 24, 2013

Day 24: Pizzelles filled with Nutella creme

Today is the last day... Wow this has gone by so fast, I can't even believe it. For the last day, we made pizzelles filled with nutella creme. Pizzelles are a thin cookie, similar to that of a cannoli. They are a very Italian style cookie. We got the inspiration to do these from my friend's mom but my mom first discovered them when my aunt used to make them. I had never tried them before today so I wasn't sure what to expect. They kind of remind me of a thin and crisp waffle which I personally like. We initially weren't sure what we were going to fill it with... Our choices were either a key lime pie filling or a nutella creme filling. I, being the chocolate lover that I am, immediately voted for the nutella filling. So that's that!!


Recipe adapted from Baking with Julia

Pizzelles: 

 1 1/4 cups all-purpose flour

1 1/2 teaspoons baking powder

2 large eggs

Pinch of salt

1/2 cup sugar

1 teaspoon vanilla extract

3 ounces unsalted butter melted and cooled

Confectioner's sugar for dusting

 Directions

  1. Preheat the pizzelle iron, and grease or spray it if suggested in the manufacturer's instructions. Set out a cooling rack for the baked cookies. Put flour and baking powder in a medium bowl and whisk to blend; set aside. In another bowl, whisk together eggs and salt until foamy, then gradually whisk in the sugar. When mixture is smooth, whisk in the vanilla, followed by the melted butter. Switch to a rubber spatula and fold in the reserved dry ingredients.
  2. Using about 2 teaspoons (we used 1/2 tablespoon of batter) for each pizzelle, place batter in center of the iron, close, and bake about 2 minutes, or until golden and firm. Don't open the iron until the steam stops. As soon as the pizzelle is baked, remove from the iron to the cooling rack and continue making pizzelles with remaining batter. Should any of the pizzelles need coaxing to come off the iron, nudge them with a spatula or fork and then peel them off with your fingers. If you want to cut the pizzelle into quarters or roll them into cones, do so the instant they come off the iron, piping hot and still pliable. Dust with confectioner's sugar before serving.

The nutella filling we improvised on since we didn't really have a recipe. So here's what we did.

Nutella filling:

A small container of nutella

3-6 ounces of cream cheese (depending on how much you want)

Powdered sugar (as much as you think necessary)

And there you go!


And of course, dust with powdered sugar to make it look especially pretty. If you want to make them look like canollis, sprinkle mini chocolate chips on the ends of the creme and they look really good!

There you have it! Wow last day, I really can't believe it. Merry Christmas to everyone and thank you for sticking with me through this process! I'll maybe do a final post tomorrow or Thursday to wrap up the project! If not, have a happy holiday! Thank you!!

Monday, December 23, 2013

Day 23: Homemade Marshmallows

If you're in for a light, airy, pillowy treat, then you came to the right place. Today we made marshmallows. Well technically not today because they need to dry out over night so last night we made marshmallows but same difference! Homemade marshmallows are twenty billion times better than the ones you can buy at the grocery store. They are much lighter and have better flavor. So if you love marshmallows, you should definitely try making them from scratch.

The recipe was adapted from the one and only, the best of the best, and our lovely idol Ina Garten.

Homemade Marshmallows-Makes 20-40 marshmallows

3 packages unflavored gelatin
1 1/2 cups granulated sugar
1 cup light corn syrup
1/4 teaspoon kosher salt
1 tablespoon vanilla extract
Confectioners' sugar for dusting

Combine gelatin and 1/2 cup of cold water in the bowl of an electric mixer fitted with the whisk attachment and allow to sit while you make the syrup. Meanwhile, combine the sugar, corn syrup, salt, and 1/2 cup water in a small saucepan and cook over medium heat until the sugar dissolves. Raise the heat to high and cook until the syrup reaches 240 degrees on a candy thermometer. Remove from heat.

With the mixer on low speed, slowly pour the sugar syrup into the dissolved gelatin. Put the mixer on high speed and whip until the mixture is very thick, about 15 minutes. Add vanilla and mix thoroughly.

With a sieve, generously dust an 8 by 12 inch nonmetal baking dish with confectioners' sugar. Pour the marshmallow mixture into the pan, smooth the top, and dust with more confectioners' sugar. Allow to stand uncovered overnight until it dries out.

Turn the marshmallows onto a board and cut them in squares. Dust them with more confectioners' sugar.


And here's what they look like cut up! Looks like a pillow right??


 We dipped some in chocolate to make it look pretty and topped those with mini Christmas tree sprinkles! Don't they look great. I can't believe only one more day! This has gone by so fast! See you tomorrow for the last blog post!

Sunday, December 22, 2013

Day 22: Chocolate Chip Biscotti

Today we made the classic cafe cookie: a biscotti. They are commonly eaten with a cup of Joe cause they can easily be dipped into a coffee cup. My mom received the recipe a long time ago but she has never made them for me before so I'm excited to try these. They were kind of a pain for me though because the dough requires kneading before it's shaped into a log and put in the oven. The dough was so sticky before kneading it. My mom volunteered me to knead the dough, so lucky me had to deal with the extremely sticky dough. I think there was a point where my hands were completely stuck together. It took some hot water and soap to resolve that issue. So moral of the story: flour your hands before you start to knead the dough!

Adapted from my cousins' aunt's recipe.

Chocolate Chip Biscotti

#1:
1 1/4 cup flour
1/2 cup mini chocolate chips
1/3 cup sugar
3/4 teaspoon baking powder

 #2:
1 tablespoon orange juice
1 teaspoon vanilla
1 egg
1 egg white
3 tablespoon canola oil

Combine #1 then Combine #2 separately and add to the flour mixture. Turn onto a floured board and knead lightly 7-8 minutes. Shape into 16 inch long log. Place on a parchment paper lined cookie sheet. Flatten long to 1 inch thick.

Bake at 350 degrees for 25 minutes. Cool 10 minutes. Cut diagonally and put back in the oven for 10 minutes on each side or until brown.

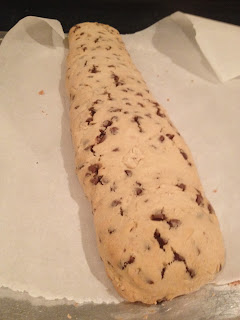
This is what the log will look like after the first round of baking!


After second round of baking and cutting in diagonals!

Now they look like something you buy at a coffee shop... Am I right?!

Only 2 days left of our project! I'm starting to get sad! Enjoy the rest of your Sunday night.

Saturday, December 21, 2013

Day 21: Red Velvet Crinkle Cookies

I'm very excited for today's cookie because they are red velvet crinkle cookies. I have a love affair with red velvet. Pretty much anything that's red velvet, I scarf down with no regrets. We got our inspiration for these cookies from Panera Bread's red velvet crinkle cookies. They looked amazing so I tried one and they were so delicious. I hope they turn out as yummy as Panera's. Red velvet is also a really nice thing to have during the holidays because its red, one of the main thematic colors of Christmastime. These cookies not only are red but they have the white powdered sugar on the outside which makes them look extremely festive. Ahhh the house smells of red velvet right now and my mouth is currently watering...

Here's the recipe. Adapted from Cooking Classy Blog.

Red Velvet Crinkle Cookies:

3 cups all-purpose flour
1/4 cup unsweetened cocoa powder*
2 tsp baking powder
1/4 tsp baking soda
3/4 tsp salt
3/4 cup unsalted butter, softened
1 1/3 cups granulated sugar
3 large eggs
1 Tbsp milk or buttermilk
1 1/2 tsp vanilla bean paste or vanilla
2 tsp lemon juice
5 tsp red food coloring
1 cup white chocolate chips
1 cup powdered sugar

In a mixing bowl whisk together flour, cocoa powder, baking powder, baking soda and salt for 30 seconds, set aside. In the bowl of an electric stand mixer fitted with the paddle attachment, whip butter and granulated sugar until pale and fluffy. Mix in eggs 1 at a time, blending until combined after each addition. Mix in milk, vanilla bean paste, lemon juice and red food coloring. With mixer set on low speed, slowly add in dry ingredients and mix just until combined. Stir in white chocolate chips. Cover bowl with plastic wrap and chill 2 hours or until firm enough to shape into balls.

Preheat oven to 350 degrees. Pour powdered sugar into a bowl. Remove dough from refrigerator, scoop dough out and with buttered hands, shape into medium balls (about 2 1/2 Tbsp each). Roll cookie dough balls into powdered sugar and evenly coat. Transfer to parchment paper lined baking sheets and flatten slightly, then bake in preheated oven 13 - 14 minutes. Allow to rest on cookie sheet several minutes then transfer to a wire rack to cool completely. Store in an airtight container. 

 *If you want them a little more chocolatey you can replace 2 - 3 Tbsp of the flour with 2 - 3 additional Tbsp of cocoa powder. 

We added the extra cocoa powder because we like the extra chocolatey  red velvet. Well at least I do... So if you are a chocolate lover, I suggest doing that switch.

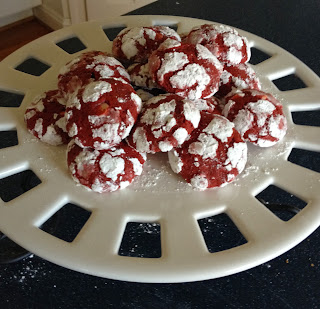
Can I just say OMG?! They look so pretty and festive and wonderful... Wow I love them.

And they taste so much better than they look which says a lot because these cookies are beautiful!

Enjoy the rest of your weekend! Only 3 days left!

Friday, December 20, 2013

Day 20: Lemon Bars

Sorry about posting so late tonight. It's finally winter break, though. It'll be nice to finally have time to relax. Today we are making lemon bars. It's important to have something other than chocolate, mint, and peanut butter in the repertoire. These are very nice because they have a nice tart flavor  that blends well with the shortbread-like crust.  Lemon is also nice and refreshing. Many citrus things are said to cleanse the palate. So it's very important to have a cookie that can cleanse the palate allowing for more cookie eating! Eat cookies to be able to eat more cookies. This logic makes no sense... Anyway, they were always one of my dad's favorites but my mom stopped making them when I was younger because my brother and I were not huge lemon fans. She says that she used to be famous for these bars so I'm very curious to taste these amazing bars.

Here's the recipe.

Recipe provided by my aunt and adapted from Overlake Cookbook.

Lemon Bars:

2 cups sifted flour
1 cup butter, softened
1/2 cup sifted powdered sugar

Preheat oven to 325 degrees. Mix above ingredients well. Pack into 10x14 ungreased baking dish. Bake for 20 minutes.

4 eggs
2 cups sugar
6 tablespoon lemon juice
2 teaspoons grated lemon rind
1/4 cup flour
1/4 teaspoon baking powder
1/4 teaspoon salt

Beat eggs lightly. Add sugar and lemon juice and rind. Sift together flour, baking powder, and salt. Beat into egg mixture by hand. Pour over cookie layer as soon as it comes out of the oven. Increase oven temperature to 350 degrees. Bake another 20 minutes until done. Sprinkle with powdered sugar. Cool. Cut into squares.

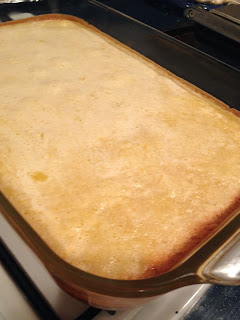
Before...

And After powdered sugar...
They look really good and I can't wait to taste them. Have a great weekend!

Thursday, December 19, 2013

Day 19: Chocolate Matzoh Toffee

Today was a busy day of baking for me! I was challenged to a bake-off on Wednesday so I baked some ricotta cookies which are similar to the sugar gems but have a nice chew and a little different flavor. They are so delicious and I hope everyone likes them tomorrow! Since I was busy making the ricotta cookies, my mom did most of the work for the toffee by herself. Although while I frosted my cookies, I helped her spread the caramel and the chocolate on the matzoh and the saltines. We made one batch with the matzoh and the other with saltines. The one with saltines we sprinkled with toasted pecans and the matzoh one we left plain. If you like toffee, you'll love this!

Recipe:

1/2 pound matzoh or saltine crackers
1 cup butter
1 cup brown sugar
12 ounces chocolate chips
1 cup chopped pecans or crumbled toffee candy

Heat oven to 450 degrees. Line 1 jellyroll pan with aluminum foil. Divide matzoh between the pans, placing in a single layer with no space between the pieces. Melt butter and brown sugar. Boil until mixture coats a spoon (3-5 minutes or more). Pour mixture over matzoh. Bake for 4 minutes then remove from oven. Sprinkle chocolate chips on top. Return to oven for 1 minute. Remove from oven and gently spread melted chocolate to cover as completely as possible. Sprinkle with chopped nuts or toffee candy, if desired. Cool completely in refrigerator. Break into pieces.

Here's a picture of the saltine toffee with the pecans. It looks super yummy. We found that the saltine toffee tastes better than the matzoh toffee because it has a nice crunch and the saltine's flavor mixes better with the matzoh flavor.

Tomorrow's Friday! It's almost winter break! YAY!