Friday, December 27, 2013

Final Post

Wow what an amazing and exhausting experience this has been. I had so much fun with this project but I am glad it's over so I can take a break from baking (and eating) a little. By Christmas Eve, almost all the cookies were being stored in my grandma's previously empty fridge and freezer in her basement and they were filled to the top. I have never seen so many cookies in my entire life, it's actually insane.

Christmas Day we had two large platters of cookies filled with a few of each cookie. They were heavy trays. My cousin Kristin wanted all of our cousins to hold a cookie and take a picture with my mom and me holding a tray with all the cookies. My mom and I were standing, holding these heavy trays for a good 10 minutes waiting for the picture to be taken. I think I developed a little arm muscle within those 10 minutes so thanks cookies!


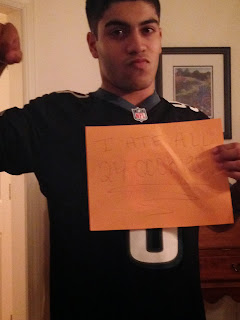
Here we all are! And if you zoom in really, really close on my arm you can see my muscle popping out... I'm just kidding with you! These are my lovely cousins, brother, and mama! Kristin came up with another great idea! She said we should have a 24 Club. Anyone who tries all 24 cookies gets to join the club. My mother and I, of course, already joined the ranks of that club but we didn't eat them all in one day. So that was the challenge presented. And one man came out victorious, my cousin Joey (the one in the Eagles jersey).

By 10:00 Christmas night, he had eaten 23 different cookies. The last cookie was at my grandma's house but he was not willing to give up so easily. So he and I drove to grandma's house and brought home all the cookies. He finished the last one and joined the prestigious 24 club. Congrats Joey!

And here's the picture to prove it! The sign isn't really visible but it says "I ATE ALL 24 COOKIES!" So there's your proof. I don't know how he did it but he did!

Yesterday, we still had the issue of cookie-filled freezer so we decided to make trays. We made them for our neighbors and some family.


Here they are all nine of them. And believe it or not we still have cookies left.... So if anyone is interested in some cookies, come visit the Burks household! We are trying to get rid of them!!!

Anyway, I wanted to give shout-out to my cousin Andrew for being such a great supporter of my blog, reading it every day! Thanks to all my friends and family who have supported us through this project, you're the best! Thanks to all of you who read my blog. I'm really glad everyone loved it and I hope at least someone got a good new recipe out of this!

Will we do it again next year? No, I have a new journey awaiting me but don't you worry, the Christmas cookie baking tradition will continue on for a long time.

Happy New Year! I hope 2014 brings you love and joy.

xoxo, Marissa

Tuesday, December 24, 2013

Day 24: Pizzelles filled with Nutella creme

Today is the last day... Wow this has gone by so fast, I can't even believe it. For the last day, we made pizzelles filled with nutella creme. Pizzelles are a thin cookie, similar to that of a cannoli. They are a very Italian style cookie. We got the inspiration to do these from my friend's mom but my mom first discovered them when my aunt used to make them. I had never tried them before today so I wasn't sure what to expect. They kind of remind me of a thin and crisp waffle which I personally like. We initially weren't sure what we were going to fill it with... Our choices were either a key lime pie filling or a nutella creme filling. I, being the chocolate lover that I am, immediately voted for the nutella filling. So that's that!!


Recipe adapted from Baking with Julia

Pizzelles: 

 1 1/4 cups all-purpose flour

1 1/2 teaspoons baking powder

2 large eggs

Pinch of salt

1/2 cup sugar

1 teaspoon vanilla extract

3 ounces unsalted butter melted and cooled

Confectioner's sugar for dusting

 Directions

  1. Preheat the pizzelle iron, and grease or spray it if suggested in the manufacturer's instructions. Set out a cooling rack for the baked cookies. Put flour and baking powder in a medium bowl and whisk to blend; set aside. In another bowl, whisk together eggs and salt until foamy, then gradually whisk in the sugar. When mixture is smooth, whisk in the vanilla, followed by the melted butter. Switch to a rubber spatula and fold in the reserved dry ingredients.
  2. Using about 2 teaspoons (we used 1/2 tablespoon of batter) for each pizzelle, place batter in center of the iron, close, and bake about 2 minutes, or until golden and firm. Don't open the iron until the steam stops. As soon as the pizzelle is baked, remove from the iron to the cooling rack and continue making pizzelles with remaining batter. Should any of the pizzelles need coaxing to come off the iron, nudge them with a spatula or fork and then peel them off with your fingers. If you want to cut the pizzelle into quarters or roll them into cones, do so the instant they come off the iron, piping hot and still pliable. Dust with confectioner's sugar before serving.

The nutella filling we improvised on since we didn't really have a recipe. So here's what we did.

Nutella filling:

A small container of nutella

3-6 ounces of cream cheese (depending on how much you want)

Powdered sugar (as much as you think necessary)

And there you go!


And of course, dust with powdered sugar to make it look especially pretty. If you want to make them look like canollis, sprinkle mini chocolate chips on the ends of the creme and they look really good!

There you have it! Wow last day, I really can't believe it. Merry Christmas to everyone and thank you for sticking with me through this process! I'll maybe do a final post tomorrow or Thursday to wrap up the project! If not, have a happy holiday! Thank you!!

Monday, December 23, 2013

Day 23: Homemade Marshmallows

If you're in for a light, airy, pillowy treat, then you came to the right place. Today we made marshmallows. Well technically not today because they need to dry out over night so last night we made marshmallows but same difference! Homemade marshmallows are twenty billion times better than the ones you can buy at the grocery store. They are much lighter and have better flavor. So if you love marshmallows, you should definitely try making them from scratch.

The recipe was adapted from the one and only, the best of the best, and our lovely idol Ina Garten.

Homemade Marshmallows-Makes 20-40 marshmallows

3 packages unflavored gelatin
1 1/2 cups granulated sugar
1 cup light corn syrup
1/4 teaspoon kosher salt
1 tablespoon vanilla extract
Confectioners' sugar for dusting

Combine gelatin and 1/2 cup of cold water in the bowl of an electric mixer fitted with the whisk attachment and allow to sit while you make the syrup. Meanwhile, combine the sugar, corn syrup, salt, and 1/2 cup water in a small saucepan and cook over medium heat until the sugar dissolves. Raise the heat to high and cook until the syrup reaches 240 degrees on a candy thermometer. Remove from heat.

With the mixer on low speed, slowly pour the sugar syrup into the dissolved gelatin. Put the mixer on high speed and whip until the mixture is very thick, about 15 minutes. Add vanilla and mix thoroughly.

With a sieve, generously dust an 8 by 12 inch nonmetal baking dish with confectioners' sugar. Pour the marshmallow mixture into the pan, smooth the top, and dust with more confectioners' sugar. Allow to stand uncovered overnight until it dries out.

Turn the marshmallows onto a board and cut them in squares. Dust them with more confectioners' sugar.


And here's what they look like cut up! Looks like a pillow right??


 We dipped some in chocolate to make it look pretty and topped those with mini Christmas tree sprinkles! Don't they look great. I can't believe only one more day! This has gone by so fast! See you tomorrow for the last blog post!

Sunday, December 22, 2013

Day 22: Chocolate Chip Biscotti

Today we made the classic cafe cookie: a biscotti. They are commonly eaten with a cup of Joe cause they can easily be dipped into a coffee cup. My mom received the recipe a long time ago but she has never made them for me before so I'm excited to try these. They were kind of a pain for me though because the dough requires kneading before it's shaped into a log and put in the oven. The dough was so sticky before kneading it. My mom volunteered me to knead the dough, so lucky me had to deal with the extremely sticky dough. I think there was a point where my hands were completely stuck together. It took some hot water and soap to resolve that issue. So moral of the story: flour your hands before you start to knead the dough!

Adapted from my cousins' aunt's recipe.

Chocolate Chip Biscotti

#1:
1 1/4 cup flour
1/2 cup mini chocolate chips
1/3 cup sugar
3/4 teaspoon baking powder

 #2:
1 tablespoon orange juice
1 teaspoon vanilla
1 egg
1 egg white
3 tablespoon canola oil

Combine #1 then Combine #2 separately and add to the flour mixture. Turn onto a floured board and knead lightly 7-8 minutes. Shape into 16 inch long log. Place on a parchment paper lined cookie sheet. Flatten long to 1 inch thick.

Bake at 350 degrees for 25 minutes. Cool 10 minutes. Cut diagonally and put back in the oven for 10 minutes on each side or until brown.

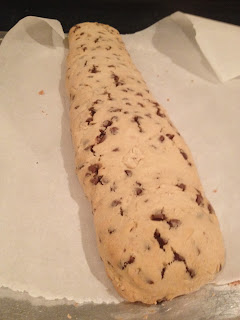
This is what the log will look like after the first round of baking!


After second round of baking and cutting in diagonals!

Now they look like something you buy at a coffee shop... Am I right?!

Only 2 days left of our project! I'm starting to get sad! Enjoy the rest of your Sunday night.

Saturday, December 21, 2013

Day 21: Red Velvet Crinkle Cookies

I'm very excited for today's cookie because they are red velvet crinkle cookies. I have a love affair with red velvet. Pretty much anything that's red velvet, I scarf down with no regrets. We got our inspiration for these cookies from Panera Bread's red velvet crinkle cookies. They looked amazing so I tried one and they were so delicious. I hope they turn out as yummy as Panera's. Red velvet is also a really nice thing to have during the holidays because its red, one of the main thematic colors of Christmastime. These cookies not only are red but they have the white powdered sugar on the outside which makes them look extremely festive. Ahhh the house smells of red velvet right now and my mouth is currently watering...

Here's the recipe. Adapted from Cooking Classy Blog.

Red Velvet Crinkle Cookies:

3 cups all-purpose flour
1/4 cup unsweetened cocoa powder*
2 tsp baking powder
1/4 tsp baking soda
3/4 tsp salt
3/4 cup unsalted butter, softened
1 1/3 cups granulated sugar
3 large eggs
1 Tbsp milk or buttermilk
1 1/2 tsp vanilla bean paste or vanilla
2 tsp lemon juice
5 tsp red food coloring
1 cup white chocolate chips
1 cup powdered sugar

In a mixing bowl whisk together flour, cocoa powder, baking powder, baking soda and salt for 30 seconds, set aside. In the bowl of an electric stand mixer fitted with the paddle attachment, whip butter and granulated sugar until pale and fluffy. Mix in eggs 1 at a time, blending until combined after each addition. Mix in milk, vanilla bean paste, lemon juice and red food coloring. With mixer set on low speed, slowly add in dry ingredients and mix just until combined. Stir in white chocolate chips. Cover bowl with plastic wrap and chill 2 hours or until firm enough to shape into balls.

Preheat oven to 350 degrees. Pour powdered sugar into a bowl. Remove dough from refrigerator, scoop dough out and with buttered hands, shape into medium balls (about 2 1/2 Tbsp each). Roll cookie dough balls into powdered sugar and evenly coat. Transfer to parchment paper lined baking sheets and flatten slightly, then bake in preheated oven 13 - 14 minutes. Allow to rest on cookie sheet several minutes then transfer to a wire rack to cool completely. Store in an airtight container. 

 *If you want them a little more chocolatey you can replace 2 - 3 Tbsp of the flour with 2 - 3 additional Tbsp of cocoa powder. 

We added the extra cocoa powder because we like the extra chocolatey  red velvet. Well at least I do... So if you are a chocolate lover, I suggest doing that switch.

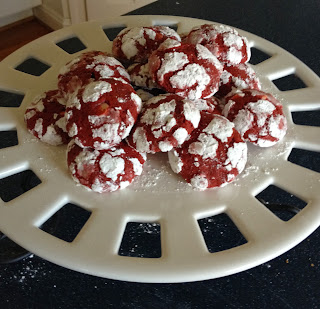
Can I just say OMG?! They look so pretty and festive and wonderful... Wow I love them.

And they taste so much better than they look which says a lot because these cookies are beautiful!

Enjoy the rest of your weekend! Only 3 days left!

Friday, December 20, 2013

Day 20: Lemon Bars

Sorry about posting so late tonight. It's finally winter break, though. It'll be nice to finally have time to relax. Today we are making lemon bars. It's important to have something other than chocolate, mint, and peanut butter in the repertoire. These are very nice because they have a nice tart flavor  that blends well with the shortbread-like crust.  Lemon is also nice and refreshing. Many citrus things are said to cleanse the palate. So it's very important to have a cookie that can cleanse the palate allowing for more cookie eating! Eat cookies to be able to eat more cookies. This logic makes no sense... Anyway, they were always one of my dad's favorites but my mom stopped making them when I was younger because my brother and I were not huge lemon fans. She says that she used to be famous for these bars so I'm very curious to taste these amazing bars.

Here's the recipe.

Recipe provided by my aunt and adapted from Overlake Cookbook.

Lemon Bars:

2 cups sifted flour
1 cup butter, softened
1/2 cup sifted powdered sugar

Preheat oven to 325 degrees. Mix above ingredients well. Pack into 10x14 ungreased baking dish. Bake for 20 minutes.

4 eggs
2 cups sugar
6 tablespoon lemon juice
2 teaspoons grated lemon rind
1/4 cup flour
1/4 teaspoon baking powder
1/4 teaspoon salt

Beat eggs lightly. Add sugar and lemon juice and rind. Sift together flour, baking powder, and salt. Beat into egg mixture by hand. Pour over cookie layer as soon as it comes out of the oven. Increase oven temperature to 350 degrees. Bake another 20 minutes until done. Sprinkle with powdered sugar. Cool. Cut into squares.

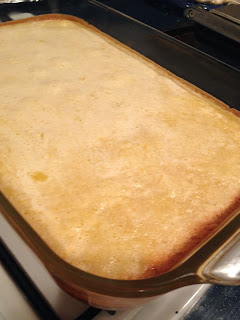
Before...

And After powdered sugar...
They look really good and I can't wait to taste them. Have a great weekend!

Thursday, December 19, 2013

Day 19: Chocolate Matzoh Toffee

Today was a busy day of baking for me! I was challenged to a bake-off on Wednesday so I baked some ricotta cookies which are similar to the sugar gems but have a nice chew and a little different flavor. They are so delicious and I hope everyone likes them tomorrow! Since I was busy making the ricotta cookies, my mom did most of the work for the toffee by herself. Although while I frosted my cookies, I helped her spread the caramel and the chocolate on the matzoh and the saltines. We made one batch with the matzoh and the other with saltines. The one with saltines we sprinkled with toasted pecans and the matzoh one we left plain. If you like toffee, you'll love this!

Recipe:

1/2 pound matzoh or saltine crackers
1 cup butter
1 cup brown sugar
12 ounces chocolate chips
1 cup chopped pecans or crumbled toffee candy

Heat oven to 450 degrees. Line 1 jellyroll pan with aluminum foil. Divide matzoh between the pans, placing in a single layer with no space between the pieces. Melt butter and brown sugar. Boil until mixture coats a spoon (3-5 minutes or more). Pour mixture over matzoh. Bake for 4 minutes then remove from oven. Sprinkle chocolate chips on top. Return to oven for 1 minute. Remove from oven and gently spread melted chocolate to cover as completely as possible. Sprinkle with chopped nuts or toffee candy, if desired. Cool completely in refrigerator. Break into pieces.

Here's a picture of the saltine toffee with the pecans. It looks super yummy. We found that the saltine toffee tastes better than the matzoh toffee because it has a nice crunch and the saltine's flavor mixes better with the matzoh flavor.

Tomorrow's Friday! It's almost winter break! YAY!

Wednesday, December 18, 2013

Day 18: Mini cheesecakes with cranberry topping

Who doesn't love cheesecake?! These are bite sized cheesecakes and they are great! The best part about these little yummy bites is that they can be made in plenty of different variations. They are traditional cheesecakes that have a graham cracker crust but all of that could be changed up. We top ours with a cranberry jam type topping because its festive for the holidays but they could be topped with lemon curd, any other type of fruit, or possibly even chocolate. Now that sounds good to me! We also came up with an idea a few minutes ago to make the crust with peppermint Oreo cookies. I kinda wish we had thought of that about an hour ago but oh well! If you are a cheesecake lover, you will never return to the Cheesecake Factory again (well, at least for cheesecake) once you taste these.

Here's how you make them!

Mini-Cheesecakes with Cranberry topping- Makes 2 dozen 1 3/4 inch cheesecakes

1 cup graham cracker crumbs
4 tablespoons unsalted butter, melted
1 8 ounce package cream cheese
1/3 cup sugar
1 large egg
2 tablespoons sour cream
1/2 teaspoon vanilla
2 teaspoons freshly squeezed lemon juice

Preheat oven to 375 degrees. Stir together graham cracker crumbs and melted butter until evenly mixed. Spoon 2 rounded teaspoons of crumbs into mini muffin tins and press into bottoms and up the sides.

Soften cream cheese. In a mixing bowl, beat the cream cheese and sugar about 3 minutes until smooth preferably with a whisk beater. Beat in the egg, scraping the sides of the bowl. Add the vanilla extract and lemon juice and beat until incorporated. Add the sour cream and beat until the mixture is blended.

Fill each graham cracker lined depression almost to the top with batter, using a spoon or a piping bag. Set the mini muffin pans on baking sheets in the oven. Bake for 10 minutes. For even baking, rotate the pans from top to bottom and front to back halfway through baking period. The cakes will puff up but deflate on cooling, leaving shallow hollows perfect for filling with topping. Cool completely in the pans on wire racks. Refrigerate for 3 hours.

Fill sink with a few inches of hot tap water. Carefully dip each pan into the water for about 30 seconds, being careful not to allow the water to get to the top of the pan. Use small metal spatula to slip in between the sides of the cakes and the pan to pop out the cakes. There is no need to run the spatula around the sides. The hot water makes unmolding easy.

Cranberry Topping-
1/4 cup water
1/4 cup + 2 tablespoons sugar
1 cup cranberries
2 1/2 teaspoons cornstarch

In a small saucepan, combine all the topping ingredients and bring to a boil, stirring constantly. Stop stirring, reduce the heat and simmer for 1 minute, swirling the pan occasionally. The mixture will be thickened but pourable. Allow it to cool to room temperature. Use a small spoon to place about 4 berries with the glaze onto each of the cheesecakes.

Since they need to be refrigerated and cooled for about 3 hours before they can be removed, I don't have a picture of them not in the tins.

So here is what they look like in the tin without being topped. I'll post a picture tomorrow of the final product so you can see how good they look.

It's almost Christmas break! Enjoy your night xoxo

Tuesday, December 17, 2013

Day 17: Pecan Tassies

Today I reached a monumental 2,000 page views so thanks to everyone who has supported and followed the blog! We made pecan tassies today. If you've ever had pecan pie, they are like miniature versions of that. My mom has made these forever. My aunt provided her with this amazing recipe. My mom keeps telling me this funny story about how she made over 100 of these shortly after I was born. She offered to bake them for my cousins' grandfather's 65th birthday party. She tells me how their grandma said that I must have been such an easy baby for her to be able to make all those cookies after I was born. I always laugh every time I hear that story. I mean it's not surprising that I was such a perfect baby ;) hehe just kidding! I love these so much. They actually might be my favorite of our wide variety of cookies. Maybe it's because the smell resonates me due to that time when the house was probably engulfed in the satisfying smell of pecans, butter, and brown sugar.

One thing that we add to enhance our pecan tassies is chocolate chips. Chocolate is one of my favorite things in the world so basically chocolate makes everything taste better in my eyes. Adding the chocolate, also reminds us of my grandma's chocolate pecan pie which also happens to be one of my favorites. The pecan tassies are like eating a pecan pie but not feeling as guilty afterwards because it's just a bite rather than a slice. To give it the chocolate flavor, we place about 3 chocolate chips over the filling before we put on the pecans so that the pecans cover up the chocolate.

Here's the recipe!

Pecan Tassies-

Shell: Makes 2 dozen
1 cup flour
3 ounces cream cheese, cut into small pieces
1/2 cup butter, cut into small pieces

Put into food processor and combine until lumpy, grainy, and sticky mass. Then form into one ball. Separate into 1 1/2 inch balls and press into small muffin tins.

Filling: Makes 4 dozen
1 1/2 cup brown sugar
2 beaten eggs
2 tablespoons melted butter
2 teaspoon vanilla
1 cup pecans, chopped

Mix together and spoon into crust, about 3/4 full. Top with chopped pecans and pat down a little. Bake in a 375 degree oven for 20 minutes. Cool for 5 minutes and take them out of tins with a sharp knife.


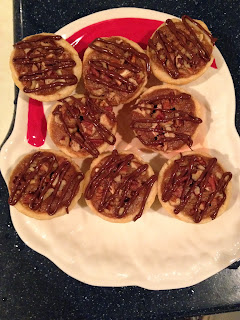
We usually make both chocolate and regular pecan tassies so to distinguish the two, I decorate the chocolate ones with some melted chocolate. I melt semi-sweet chocolate chips in the microwave at 20 second intervals. Once the chocolate is melted, I fill it in a piping bag and pipe the zigzag design on to the cookies. Aren't they pretty? :)

By the way, I tasted one and they are the bomb! So if you are looking for a really good Christmas cookie, this is your cookie! I highly recommend them! Enjoy the rest of your night and see you tomorrow.

Monday, December 16, 2013

Day 16: Peppermint Bark

Only 8 days left until Christmas Eve, the last day of our project! :( Today we made one of my favorite little treats, Peppermint Bark. I love it because it combines two of my favorite things, chocolate and peppermint, into one beautiful, heavenly concoction. It's also great because it's really easy to make and the final product is very appealing, a nice confection to add to that Christmas cookie platter! My mom never really used to make the bark until I expressed my affection for it to her. The last time I remember her making it was for my sweet sixteen dinner that we had at my house. My friends, family and I sat down to a 6 course meal, prepared by my mother, where she made little treats for after dinner and one of them was the peppermint bark. Now that was a good meal. Every time I eat the bark, it reminds me of winter and the holiday season which brings me joy. I love this and I am so glad we are adding it to the cookie platter this year.

Here's how you make it.

Adapted from Bon Appetit  Magazine:

Layered Peppermint Crunch Bark- Makes about 36 pieces

17 ounces good quality white chocolate, finely chopped
7 ounces bittersweet or semisweet chocolate, chopped
6 tablespoons whipping cream
3/4 teaspoon peppermint extract

Turn large baking sheet bottom side up. Cover securely with foil. Mark 12x9 inch rectangle on foil. Microwave half of white chocolate at 20 second intervals until completely melted. Then add the rest of the chocolate to temper the chocolate. The heat of the already hot chocolate will melt the rest of the chocolate, this avoids burning the chocolate. Pour 2/3 cup melted white chocolate onto rectangle on foil. Using spatula or knife, spread chocolate to fill rectangle. Sprinkle with 1/4 cup crushed peppermints. Chill until set, about 15 minutes.

Do the same process of tempering with the semi-sweet chocolate then add the cream and the peppermint extract and mix well. Cool to barely lukewarm, about 5 minutes. Pour chocolate mixture in long lines over the set white chocolate and spread layer evenly. Refrigerate for about 25 minutes, until firmed and cooled.

Rewarm the remaining white chocolate. Working quickly, pour white chocolate over bark, and spread to cover. Sprinkle with remaining crushed peppermints. Chill just until firm about 20 minutes.

And there you have it! A yummy holiday treat!

P.S. Make sure to have the last layer of white chocolate be really warm before you put it on the rest of the bark so that it doesn't immediately cool and simultaneously sprinkle the peppermint candies because they won't stick if the white chocolate cools too quickly. Also wait to get the bark to room temperature before cutting it because it separates if you don't.

Sunday, December 15, 2013

Day 15: French Macarons

I wasn't kidding when I said special treat yesterday. Yes, it's true. Today we attempted to make the infamous french macarons. Not only did we attempt, but I think we almost succeeded. I say almost because most of them turned out beautifully but as the batter sat out longer waiting to bake off in the oven, the more deformed they became after we removed them from the oven. So lesson learned. They also are not completely perfect because the buttercream that the recipe called for just didn't turn out as great as we had hoped but sandwiched between the macarons, they tasted pretty good. Since they turned out pretty well, I think its safe to say that my mom and I are "officially" bakers and truly appreciate all the professional bakers out there who make these confections on a regular basis. It was one of the most time consuming and precise processes I have ever experienced in the kitchen. To be completely honest, I would rather buy macarons than make them myself because its just a lot easier and the bakeries do them pretty well (probably better than mine). I'm happy that we took on the challenge of making them, though. I'm glad to say that we made them and they turned out well.

We made a vanilla bean macaron. My hands still smell like vanilla bean and I literally cannot stop smelling my hands because the scent is so delicious and pleasant. I like the vanilla because they are very simple yet yummy. If we were to ever make these again, the only thing I would change is the buttercream. We would need to try a new filling, maybe chocolate or raspberry?

We adapted the recipe from the Bouchon Bakery cookbook. I'll give the ingredients and some basic instructions but if you're interested in the detailed instructions and some good tips, check out the cookbook. It is an amazing cookbook filled with recipes for delectable pastries.

Vanilla Macarons-

1 3/4 cups + 2 1/2 tablespoons almond flour/meal
1 3/4 cups+ 1 tablespoon +2 teaspoons powdered sugar
1/4 +1 1/2 tablespoons egg whites
1/4 cup + 2 tablespoons egg whites
1 vanilla bean, split lengthwise
1 cup + 3 tablespoons sugar
2/3 cup water

Vanilla Buttercream Filling-

3 tablespoons + 1/2 teaspoon sugar
 1/4 cup + 1/2 teaspoon egg yolks
1/4 cup + 2 1/4 teaspoons whole milk
8.8 ounces of unsalted butter, room temperature

Honestly, the instructions are very long and detailed, so if you are interested in trying this recipe,  search the internet for Bouchon Bakery's macaron recipe and you'll find it or go out and buy the cookbook if you're in need of a new cookbook.


Aren't they just so beautiful?! I think they are so pretty, I just love them! Honestly, I think that they appeal so much to us because of how they look rather than how they taste, although they are quite scrumptious. The recipe said that to give it the chewy yet light and airy texture you're looking for in a macaron, they should be put in the freezer for at least a day before being served to get to that texture.

So, so pretty! I hope you enjoyed reading about our fun little challenge today. Sunday Funday, right? :) enjoy the rest of your day!

Saturday, December 14, 2013

Day 14: Mincemeat Pies

Now I know what you're thinking... Mincemeat? Are they crazy? That sounds disgusting! But mincemeat does not consist of actual meat. It's a pie filled with a mixture of dried fruits and nuts. Although the name makes it sound unappetizing, it's actually delicious. It originated in Europe during the 15th and 16th century. Back then, they actually made the pies with either beef or beef fat. It got its name for the ground or minced meat that used to be in the mixture. But don't worry, we don't put meat in ours. Traditionally, it is made into one normal sized pie, like an apple or pumpkin pie. We make them into individualized pies that almost resemble that of an apple turnover. My mom has loved mincemeat since one of her high school friend's parents served her the pie. She started making them 15 years ago and has been making them ever since. The mini ones are a nice twist on the traditional mincemeat. We also add a glaze to the pies because glazes just make everything better, right?!

Here's the recipe.

Adapted from Gourmet Magazine:

Dried Fruit Mincemeat-

1 1/2 cups mixed dried fruit such as pears, apricots, apples, prunes, peaches, and figs (about 3/4 pounds in total)
1/2 cup pitted dates
1/2 teaspoon cinnamon
1/2 teaspoon ground all spice
1/4 teaspoon nutmeg
1/8 teaspoon salt
1/3 cup sugar
1/2 cup dried cranberries (about 3 ounces)
2 cups plus 2 tablespoons water
1 tablespoon cornstarch
2 tablespoons brandy
3/4 cup pecans (about 3 ounces)

In a food processor coarsely chop mixed dried fruit and dates with spices, salt, and sugar. In a heavy saucepan combine dried fruit mixture, cranberries, and 2 cups water and cook at a bare simmer, stirring occasionally, 10 minutes, or until the fruit is tender. In a small bowl, stir together cornstarch and 2 tablespoons water until combined well. Stir cornstarch mixture into dried fruit mixture and simmer, stirring frequently, 2 minutes. Stir in brandy and cool mincemeat.

The dough we use for the pie is Melissa D'Arabian's dough from her Petite Orange and Raspberry Pochettes. 

Here's how you make it:

2 sticks unsalted butter, room temperature
8 ounces cream cheese, room temperature
2 cups all purpose flour

Beat the butter and cream cheese in a bowl with a mixer until light and creamy. Slowly add the flour, mixing just until a dough forms (do not over mix). Divide the dough into two balls, then flatten each into a disk. Wrap plastic wrap and refrigerate until firm, at least an hour.

Preheat oven to 375 degrees. Roll out disk of dough on a floured surface with a floured rolling pin to 1/8 inch thick. Cut out rounds using a 3 inch cutter. Top each with about 1/2 teaspoon of mincemeat filling. Brush the edges of the dough with water, then fold the dough over to make a half moon and press to seal. Crimp the edges with a fork to better the seal and to give it a nicer look. Place on an ungreased baking sheet. Bake for 20-22 minutes or until the cookies are golden brown.

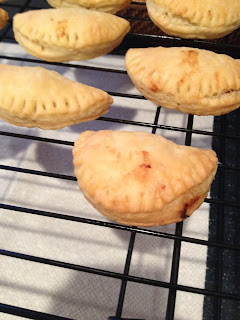
And here's what they look like! Then we glazed them with a confectioners sugar, milk, and vanilla glaze, kind of like a royal icing.


After Glaze! Don't they look super pretty :)


I hope this makes people who once feared mincemeat, not as scared anymore because of the unappealing name. They actually are really yummy! Enjoy the rest of your weekend and come back tomorrow for an extra special treat! xoxo

Friday, December 13, 2013

Day 13: Wheat Thin Sandwiches?

We have passed the half way point in the project! Yay!! Today we are making wheat thin sandwiches... That sounds weird doesn't it? But actually they are so good. My mom and I discovered these sweet and salty sandwiches of deliciousness at my cousin's pre prom party about two years ago. We saw these little squares covered white chocolate and tasted them. They were so good, I mean we couldn't stop eating them good. We had absolutely no idea what they were but we knew we needed to figure out what they were. We dissected them as a scientist dissects a frog. We pulled apart the two crackers and found the peanut butter inside. So we discovered one ingredient but we couldn't figure out what the crackers were so we kept eating them and eating them until finally someone realized they were wheat thins! We were so proud that we finally solved the mystery of the curious, addictive chocolate squares. Ever since that day we've been wanting to make the scrumptious treat. So when we planned this project, we decided to test them out. Since we don't have a recipe or anything for this, we are going to "play it by ear" as they say.

What you'll need:
(Quantity depending on how many you wish to make)
Wheat Thin crackers
Peanut Butter
White or Milk Chocolate, melted

Sandwich two wheat thin crackers together with peanut butter. Put them in the refrigerator to let them cool or to speed up the process, put them in the freezer. They need to cool so that they peanut butter does not melt once they are dipped in the hot, melted chocolate. While they are cooling, melt the chocolate of your choice, milk or white (we used white). Once the sandwiches are cooled completely, dip them in the chocolate and place them on a baking sheet lined with parchment paper. Let the chocolate set before serving.


We sprinkled them with sanding sugar because it's not Christmas unless everything is decorated with red and green looking stuff. Am I right??

They are really good, just as good as we remembered! I'll see everyone here tomorrow but if not enjoy your weekend!

Thursday, December 12, 2013

Day 12: Pretzel Turtles

Turtles are a very popular candy that my mom and I love. A few years ago, we found a recipe for pretzel turtles that looked absolutely delicious so we tried it out. It was made of pretzels, a dove caramel chocolate, and a pecan. They were a hit but we always found them to be extremely messy and they didn't look very pretty which is an important factor to food (duh!). We made them for years because they tasted so good but we were always disappointed in how they appeared. A week or so ago, we found a recipe on Ree Drummond's blog for pretzel turtles that looked 10x prettier than the ones we made and they looked pretty simple to make. So today, we tried making Ree's pretzel turtles. We weren't sure what to expect since we have never made them before but they turned out pretty well. Although they were much more laborious to make than the others.

Here's how you make them!

Adapted from Ree Drummond's Pretzel Turtles:

Pretzel Turtles-

24 whole mini-pretzel twists (we used pretzel waffles)
24 whole individually wrapped caramel squares, unwrapped
8 ounces milk chocolate, melted
24 whole pecan halves

Preheat oven to 325 degrees. Place the pecan halves in a single layer on a baking sheet and put in oven for 5-6 minutes until they're lightly toasted. Line baking sheet with parchment paper. Arrange pretzels neatly on the pan, then top each pretzel with an unwrapped caramel. Place the pan into the oven for 4-5 minutes or until the caramels have softened (not melted). Gently press a pecan half onto each caramel, just enough for the caramel to fill the pretzel. Set them aside to cool completely. Meanwhile, melt the chocolate. When the pretzel/caramels are cooled, remove from baking sheet. Spoon small dollops of chocolate all over the baking sheet, then lightly drop each pretzel onto the middle of each dollop (make sure they are centered). Allow them to cool completely before serving.


They look gorgeous. We drizzled the tops with white chocolate to make it just a little prettier and more "holidayish".

Although they look really good, I have to say they don't compare to the other pretzel turtles we make. They have a great flavor but the texture of the caramels are too chewy while the chocolate is too soft, making it difficult to enjoy the flavor of the candy. Sorry Ree, but I think we'll probably stick with our turtles next year, although yours truly are beautiful. Thanks for reading and I'll see you tomorrow!

Wednesday, December 11, 2013

Day 11: Smores Cups

Let me just say that these are AMAZING. My mom found the recipe last spring and made them for my pre prom party thingy. Although none of the girls ate them during the actual pre prom, because you know we couldn't risk getting bloated and our dresses exploding (worst case scenario), my mom sent them to the after prom party and when we found them, let's just say, they weren't around for very long. They take little time to prepare and taste so delicious so they are a great treat to make for tailgates, parties, and apparently pre proms. If you are a smores lover, you will absolutely die for these. They combine all the gooey-ness, chocolatey-ness, and addictiveness of a smore into one single bite. Also since it's bite sized, you don't have to feel as guilty about eating one (well maybe a little guilt but definitely worth it).  I personally think these are addictive so I try to avoid eating them although, let's be real, I can't not eat them. They are just too delectable and indulgent. Yes, indulgent is the perfect word to describe these.

Here's how you make them.

Adapted from blog Mom to Mom:

Mini Smores Cup Recipe- Makes 24

1 cup finely crushed graham cracker crumbs
1/4 cup confectioners sugar
6 tablespoons melted butter
4 milk chocolate Hershey bars
12 large marshmallows

Preheat oven to 350 degrees. Mix graham cracker crumbs, confectioners sugar, and melted butter in a bowl. Press a small amount into mini-muffin tins (24 cups total). Bake for 4-5 minutes until the edges of the cups start to bubble slightly. Break 2 of the Hershey bars into rectangles and put one rectangle in each graham cracker cup. Cut marshmallows in half crosswise. Put one half marshmallow, cut side down, on each cup. Put them back in oven for 1-2 minutes until marshmallows are slightly softened. Let muffin tins cool for about 15 minutes and then remove from cups from the tins. When the cups have completely cooled, melt the two extra chocolate bars in the microwave and dip the top of each of the cups in the chocolate. Then let the cups set.

We sprinkled them with snowflake sprinkles to get into the holiday spirit! Always gotta have sprinkles!

They are so good I had to snag one for myself!


 They'll keep making you come back for s'more! Enjoy and Goodnight!

Tuesday, December 10, 2013

Day 10: Ginger Snaps

This week is just flying by! I guess it's due to the fact that we haven't had school in 5 days. Today, I spent the day sledding, sipping hot chocolate, and hanging out with my friends. I have to say it's been quite nice having time to relax and enjoy the company of my friends and family. Now on the subject of food, Ginger Snaps are cookies of the day. These are another classic Christmas cookie that just speak the holidays. The combination of cinnamon, ginger, and other spices seems very festive to me. We first stumbled upon the recipe for these cookies when my aunt made a cheesecake with a ginger snap crust one Christmas. We loved the crust so much that we decided to bake the cookies on their own and we have made them ever since. They are such a yummy holiday treat that are meant specifically for this time of year and only this time of year.

Adapted from the Inn at Little Washington's recipe.

Gingersnap Cookies-Makes about 4 dozen

2 cups flour
1 tablespoon baking powder
1 teaspoon ground cloves
1 teaspoon cinnamon
1 teaspoon ground ginger
1/4 teaspoon salt
3/4 cups butter, room temperature
1 cup sugar
1/4 cup light molasses
1 egg
1/3 cup sugar

Preheat oven to 350 degrees. Sift first 6 ingredients into bowl. Using electric mixer, cream butter with 1 cup sugar in another bowl until light and fluffy. Mix in molasses and egg. Add dry sifted ingredients and mix until just combined. Cover and refrigerate dough for at least an hour. Using 1 tablespoon per cookie, form dough into rounds. Roll rounds in 1/3 cup sugar. We use colored sanding sugar to roll the cookies in, usually red or green, because sprinkles and sugar just make everything better right?! Then bake until cookies are brown on bottom, about 12 minutes.

 And here's what they look like! A little crisp on the outside with a nice chew on the inside. Mmmm!

And here I am with my lovely ginger snaps! My teacher suggested that I be in one of my pictures with my treats so here it is! I hope your happy :) Time to get some work done since we will most likely have school tomorrow! Enjoy the rest of your night!

Monday, December 9, 2013

Day 9: Oatmeal Creme Pies

Today has been such a relaxing, lazy snow day for me and I hope if you had the chance to stay home, you enjoyed your day as much as I enjoyed mine. We are making a classic today, Oatmeal Creme Pies! Now, I'm sure many of you have heard of Little Debbie's Oatmeal Creme Pies. Those inspired us to make our own version of the fan favorite cookie. Like the sugar gems, we make these constantly for tailgates, school functions, and parties because everyone adores them. My aunt initially gave us the idea when a parent at one of her daughter's field hockey tailgates made homemade versions of the classic treat. We decided to try them out and they ended up being a hit. Usually, we make just the classic oatmeal raisin cookie and plaster two of them together between store bought vanilla frosting. I know this sounds like cheating but I swear that we tried homemade frosting and store bought and found that the store bought just worked better with them. But we found a new frosting recipe that we tried out today and have decided we will continue to make this frosting because it is so delicious.

During the holidays, we try to mix it up a little, so we make a batch with craisins and a batch with raisins. The craisins add the reddish color to the cookie that gives it a more festive look and it also tastes like the holidays (if I had ever tasted the holidays, I'm sure it would taste like craisins).

Here's the recipe.

Adapted from Quaker Old Fashioned Oats Box.

Vanishing Oatmeal Raisin Cookies:

1/2 cup plus 6 tablespoons softened butter
3/4 cups brown sugar
1/2 cup sugar
2 eggs
1 teaspoon vanilla
1 1/2 cups flour
1 teaspoon baking soda
1 teaspoon cinnamon
1/2 teaspoon salt (optional)
3 cups Quaker Oats
1 cup raisins or craisins

Preheat oven to 350 degrees. Beat butter and sugars until creamy. Add eggs and vanilla. Beat well. Add combined flour, baking soda, cinnamon, and salt. Mix well. Add oats and raisins. Mix well. Drop rounded tablespoons of dough on cookie sheet. Bake 8-10 minutes or until light golden brown.  Flatten cookie with back of a spatula while hot. Remove from baking sheet to wire rack.

White Chocolate Buttercream:

2 cups white chocolate chips
1 cup unsalted butter at room temperature
3-4 cups powdered sugar
1 teaspoon vanilla
2 tablespoons milk

Place half of white chocolate chips in microwave and heat at 30 second intervals until melted. Then add in the rest of the chocolate chips into the melted chocolate to temper the chocolate. Stir until chocolate is smooth with no lumps. Beat butter in electric mixer until fluffy. Beat in half of powdered sugar, melted white chocolate, vanilla and milk until the mixture is smooth and creamy. Slowly beat in remaining powdered sugar until smooth. If frosting is too stiff, add a little more milk. Frost one side of cookie and sandwich it with another.


Yum, yumm, yummy! Don't they look delish! Well I just found out that school's cancelled tomorrow again due to snow so I'm going to celebrate with a cookie. Enjoy your Monday and see you tomorrow right here!

Sunday, December 8, 2013

Day 8: Sugar Gems

Snowy Sundays are the best Sundays. Especially because baking on Sundays when its snowing is so satisfying and relaxing. Today we are baking one of our most famous cookies, Sugar Gems. These are our "go-to" cookie that we bake for tailgates, parties, school functions, etc. Since we bake them so often throughout the year, we like to change them up a little during the holidays. We sprinkle them with peppermint crumbles and although this may seem only decorative, the peppermints infuses into the frosting that we top the cookie with and makes for a great festive treat! I actually prefer the peppermint sugar gems over the originals because the peppermint complements the sugar cookie very nicely. Anyone who likes the sugar cookies that can be bought at the grocery store will love these 1000x more. I cannot even express to you how much better these are and the peppermint makes them even more delectable.

My aunt made these cookies frequently and my entire family fell in love with them. My brother, especially, grew fond of them and wanted my mom to bake them for him. Although it took a little effort to convince my aunt to reveal her sacred recipe, my mom convinced her to do so. During "Snowmageddon" about four years ago, we were trapped in the kitchen for an entire week (how nostalgic that we happen to be making them again on a snow day). We tested these one time but they failed to turn out the way my aunt's did. We were determined to perfect these cookies that we re-made them three times. Yes, THREE TIMES. Most people, the first time, would just give up. But not us. And we found a way to perfect them. Since then, they have topped the charts of our cookie repertoire.

Aren't they beauties! Of course this is the unfinished product but they look pretty perfect even without the frosting!


Now here's how you make them!


Sugar Gems
Cream together:
1 cup powdered sugar
1 cup sugar
1 cup oil or melted butter (we use melted butter)
1 cup softened butter
2 eggs
1 teaspoon vanilla

Add:
5 cups flour (we use between 4 1/2 or 5 cups, it depends)
1 teaspoon cream of tartar
1 teaspoon salt (we use 1/2 teaspoon)
1 teaspoon baking soda

Mix all ingredients well. Refrigerate overnight or put into freezer until thoroughly chilled. Roll into golf size balls and roll the balls in sugar before placing them on a parchment covered baking sheet. Then slightly flatten the balls with the palm of your hand. Bake at 350 degrees for 12-14 minutes (12 minutes works for us). Let them cool before frosting them.

Sugar Gem Frosting
2-2 1/2 cups powdered sugar
1/2 cup oil (we use softened butter)
2 teaspoons vanilla
3-4 tablespoons milk
Coloring if wanted

Mix well and add a little more milk or powdered sugar to get the perfect consistency. Frost cookies and sprinkle with peppermint crumbles.


Here's the finished product... Now don't they look so delicious!


The peppermint truly makes them look very festive. And by the way, please don't judge my photography skills. I already vented (kinda) on my lack of "the eye" for photography. 

Enjoy the rest of your Sunday and cross your fingers for a snow day tomorrow! Maybe wear your pajamas inside out?! :)

Saturday, December 7, 2013

Day 7: Rugelach

It's been quite the eventful Saturday for me filled with eating, shopping, and spending time with my friends, but don't worry we did not forget about our cookies! We made a traditional Russian-Jewish pastry today: Rugelach. Rugelach is fun to make because they can be filled with many different types of jams or fillings. Today, we made two different kinds of Rugelach. One filled with raspberry and sprinkled with cinnamon sugar and pecans and the other filled with nutella and hazelnuts. Therefore, you add two more varieties of cookies to your cookie platter without the effort of making two different doughs. How efficient!

Recipe Adapted from The Dairy Hollow House Cookbook:

Rugelach- Makes 3 dozen

1 cup cream cheese
1 cup butter
1 teaspoon vanilla
4 tablespoons sugar
dash of salt
2 cups unbleached flour
1/2 cup sugar
1 3/4 tablespoon cinnamon
2/3 finely chopped pecans or walnuts
jam

Soften cream cheese and butter to room temperature. Cream butter and cream cheese together until smooth and thoroughly blended. Beat in vanilla, 4 tablespoons sugar, dash of salt, and one cup of flour. When smooth, stir in an extra cup of flour. Turn dough out onto lightly floured board and knead until dough comes together. Divide dough into fourths and pat each third into a thick, flattened circle. Refrigerate for about an hour. Preheat oven to 350 degrees. Combine tossing together 1/2 cup sugar, cinnamon, and nuts. Working with dough circles one at a time, remove from fridge and roll out into a circle about 14 inches. Spread dough with jam or other filling and then sprinkle with toppings. Divide dough into 12 pie-shaped wedges per dough circle. Roll dough from wide end to smaller end. Male sure to line your baking sheets with parchment paper. It makes the process of removing them from the sheet much easier and cleaner. Bake for 15-20 minutes. When removed from oven, sprinkle with powdered sugar.

Here are the traditional ones with raspberry filling and sprinkled with cinnamon sugar topping.


And here are the ones with nutella filling and sprinkled with hazelnuts.


Although they both are delicious, my mom and I came to the consensus that the traditional jam filled ones reign supreme. Enjoy the rest of your Saturday night and cross your fingers for snow tomorrow! 

Friday, December 6, 2013

Day 6: Black bottoms

Finally, it's the weekend! I hope everyone is doing something relaxing and enjoyable. Black bottoms are the center of attention today. They perfectly combine chocolate cake and cheesecake into one scrumptious bite of goodness. They can be baked in a normal size cupcake pan or in a miniature muffin pan, which is what my mother and I do.  My mom has been baking these for over 17 years and they have always been in her, and now our, repertoire. I like them because the chocolate and the cream cheese mixture complement each other extremely well so that the cupcake is not overly sweet or "cream cheesy" (my technical term used to describe cream cheese). My mom received the recipe from my aunt who discovered it years before I was born, when one of her co-workers shared the recipe with her.

Here's the recipe:

Black bottom Cupcakes- Makes 5 dozen mini cupcakes or 18 regular size (my mom and I make mini)

8 ounces cream cheese
1 egg
1/3 cup sugar
Pinch of salt
1 1/2 cups semi-sweet chocolate chips
1 1/2 cups flour
1 cup sugar
1/4 cup unsweetened cocoa powder
1 teaspoon baking soda
1/2 teaspoon salt
1 cup water
1 tablespoon vinegar
1/3 cup vegetable oil
1 teaspoon vanilla

Mix cream cheese, egg, sugar, and salt until creamy. Stir in chocolate chips and set aside. Sift together flour, sugar, cocoa powder, baking soda, and salt. Mix dry ingredients with water, vinegar, oil, and vanilla. Divide chocolate mixture evenly into cupcake tins with liners. Put a spoonful of cream cheese mixture in the center of the cocoa mixture. Bake at 350 degrees for 30-35 minutes for large cupcakes and 15 minutes for miniature cupcakes.

And of course to make things look festive, we sprinkled the red and white sanding sugar on top.


Don't they look yummy!


Enjoy your weekend but make sure to pop back in and check out the cookies we are making Saturday and Sunday! See you back here tomorrow :)

Thursday, December 5, 2013

Day 5: Coconut Macaroons

5 days down, 19 more to go! The cookie of the day is coconut macaroons. If you love coconut, these cookies are meant for you. They basically consist of coconut and sweetened condensed milk so how could they not be delicious! I do not really have a story for these but we have baked these for as long as I can remember. I used to despise coconut so whenever I saw these, I turned the other direction. But now that I like coconut, these have become surprisingly high on the list of my favorites. If you get the chance to try these, you'll understand why.

Recipe adapted from Eagle Brand Dessert Cookbook:

Coconut Macaroons- Makes about 4 dozen

1 (14 ounce) can Eagle Brand Sweetened Condensed Milk
2 teaspoons vanilla extract
1 to 1 1/2 teaspoons almond extract
2 (7 ounce) packages flaked coconut (5 1/3 cups)

Preheat oven to 325 degrees. Line baking sheets with Reynolds Non-Stick Wrap. In a large bowl, combine sweetened condensed milk, vanilla, and almond extract. Stir in coconut. Drop rounded teaspoonfuls onto sheets with spoon and slightly flatten each mound. Bake for 15-17 minutes or until golden.

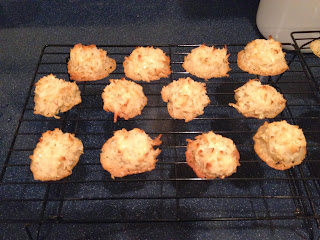
This is what they will look like perfectly baked, a nice golden brown on the edges and on the tops.


We also make some of the macaroons with chocolate on the tops. If you like Mounds candy bars, that's exactly what they taste like but even better! I personally prefer the ones with chocolate on top because I love absolutely anything with chocolate on it. We put a Hershey kiss on the top right after we have removed them from the oven and then we let them melt and then use a knife to spread the chocolate evenly on the tops of the macaroons.

P.S. I apologize for posting these so late. I try to finish my homework before I start baking and blogging so I am not able to start until later. Thanks for reading!

Wednesday, December 4, 2013

Day 4: Butter Press Cookies

Happy Hump Day! Wow this week flew by quickly, probably because it's been an extremely fun week of baking (well at least for me). Today we made a cookie that has been in our family for generations: butter press cookies, commonly known as spritz cookies. My great-grandmother made them for my grandma, who made them for my daddy. Of all of the Christmas cookies my grandma baked, he proudly declares these to be his favorite. Therefore, each and every year we bake these classic cookies to satisfy the palate of my goofy, super awesome daddy.

Here's the recipe adapted from my grandma's recipe:

3 cups flour
1/2 teaspoon baking powder
1/4 teaspoon salt
1 cup butter
1 cup sugar
1 egg
2 teaspoons vanilla
1/4 teaspoon almond extract

Preheat oven to 350 degrees. Cream butter, vanilla, and almond extract. Add egg and sugar. Add dry ingredients. Chill thoroughly. Bake for 10 minutes.

We press them in a Christmas tree shaped cookie press but you can use any shape of your choosing. To make them look extra festive and special for the holiday, we sprinkle the cookies with red and green sanding sugar before we put them in the oven. This allows for the sprinkles to stick to the cookies. If you sprinkle the cookies after baking, the sugar will not stick and it will just make a huge mess.

Here is what they look like!


And more!

Closeup picture!
Enjoy the rest of your day and thanks for reading!

Tuesday, December 3, 2013

Day 3: Peanut Butter Temptations

Now doesn't that sound tempting! These cookies are absolutely delicious. They contain the ideal "peanut butter-iness" that everyone desires to taste in a peanut butter cookie and the reason for this is because of the Reese's peanut butter cup placed right in the center of the cookie. These cookies are adapted from my aunt's mother-in-law's recipe and I am so thankful we have the pleasure of making these cookies because they are just so darn delectable.

Here is the recipe:

Peanut Butter Temptations- Makes 40 cookies

Ingredients:
1/2 cup butter
1/2 cup peanut butter
1/2 cup white sugar
1 egg
1 teaspoon vanilla
1 1/4 cup flour
3/4 teaspoon baking soda
1 package peanut butter cups

Preheat oven to 375 degrees. Cream together peanut butter, butter, and sugar. Beat in egg and vanilla. Mix well. Sift in and blend in flour and baking soda. Shape dough into 1 inch balls and place in an ungreased small muffin tin. Bake 8-10 minutes and while they are baking unwrap the peanut butter cups. Once cookies are removed from oven, immediately press a peanut butter cup in each until only the top shows. Let set for a few minutes and remove from muffin tin.

And there you have it! They are very simple to make and not too time consuming. They also would be a great thing to do with kids because they can press the peanut butter cup into the cookies and then sprinkle the tops of the melted chocolate with festive sprinkles. That's what my mother and I do. We sprinkle them with festive colored sprinkles to make them extremely pretty.

Here is what they will look like.


See the sprinkles make it look much prettier! And of course I had to taste one for myself just as any decent baker does to make sure it tastes good. It was okay, I guess. Just kidding, it was so delicious I'm restraining myself from eating another... that's how good they are. 

Now does this make your mouth water or what? Thanks for reading my blog so far and I hope you continue reading it! Have a great rest of your Tuesday!

Monday, December 2, 2013

Day 2: Chocolate Pretzel Rings

Hello Readers! Happy Monday!

Today we made one of the cookies (I guess it's more of a confection) that we have made since I was in first grade. We call them chocolate pretzel rings but many people refer to them as bellybuttons. I refuse to call them bellybuttons because eating something called a bellybutton makes me nauseous  and I have been calling them pretzel rings since I sat in a booster seat and still had perfect ringlet curls for hair. My mom keeps telling me about the first time we made these sweet and salty rings of goodness together. She said there was a snow storm approaching that day and her co-worker was raving about this pretzel rings recipe she had found online and talking about how she was going to test them out since the snow storm would keep her inside for a few days. My mom and a few other of her co-workers decided to try them too so that night my mom and I made the scrumptious treats and have been making them ever since. I know many people make these now but these will always be special to me since they were one of the first things I baked in the kitchen.

What you need to make them (and of course this all depends on how many you plan on making):

-A Bag of Utz's Pretzel Wheels
-A Bag of Hershey kisses (Hugs kisses work well too)
-A Bag of M&M's

The recipe calls to preheat the oven to 275 degrees F although my mom and I suggest to test one or two in the oven before hand to make sure this temperature works for your oven. We have found that 225 degrees F works better for us. Once you have placed the pretzels with the Hershey kisses on top on a baking sheet, put them in the oven for 3 minutes to allow the chocolate to melt. Also, use Reynolds Non-Stick Wrap on the baking sheet. Now here is the trick to really attractive pretzel rings. Rather than pushing the M&M into the kisses after you remove them from the oven, I use a knife to spread out the chocolate on the pretzel so it is melted evenly and there are no clumps.

If you use the knife like I do, this is what they look like. I think they look cleaner and prettier than just pressing the M&M straight into the kiss but do whatever works easiest and best for you.

Thanks for keeping up with my blog and stay tuned for more delicious holiday treats!


Sunday, December 1, 2013

Day 1: Gingerbread Men

Today is Day 1! I am so excited to start this journey and to share it with you all. The cookie of the day is Gingerbread Men! Gingerbread Men are so fun to make because they are extremely festive and they bring out my artistic side. These cookies allow for complete artistic expression and creativity so the decorations can be pretty simple or extremely elaborate (I would say my level of decoration skill lies in the middle of those two). I have always loved to make these cookies as well because they are a fun project to do with kids or friends. In the past, I held a Christmas cookie party at my house with my close friends and we decorated the gingerbread men. I was expecting beautifully designed cookies that my mom and I could serve at our Christmas dinner. Let's just say my friends were too creative in their designs. Also, we devoured them all before we finished decorating because they are so yummy. They are also a very special cookie because they really are only designated to Christmastime. It would be quite odd to bake a batch of gingerbread men in July.

Okay so now I am going to talk about what works for my mom and I when making these cookies. We make the dough before hand because it needs to refrigerate overnight. If it does not have time to cool, the dough will be too sticky and it won't roll out easily. When rolling the dough out, my mom and I use powdered sugar rather than flour because it is a sweet cookie so it should be rolled in something sweet! When it comes to piping the cookies, I whip up royal icing and use a piping bag with a small tip to get the thin, clean lines. The only down side to piping is how sore my hand gets afterwards so if you plan on piping them, make sure to have your hand masseuse on speed dial.

Now I promised professional pictures so here they are!

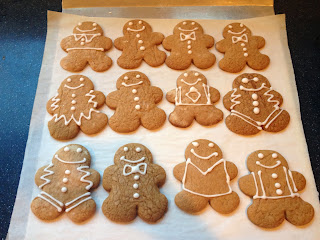
Oh hey that's me! This little guy was my favorite design of the day. His suspenders and bow tie make me super happy! If I say so myself, I did a pretty good job with him :)


 Here are some more of my prettier ones!

More of my boys!

I think they turned out very well. And they taste even better than they look! I hope you all keep following my baking adventure and enjoy what you have seen so far! Thanks and have a great last few hours of your weekend!

Recipe Adapted from Williams-Sonoma's "Holiday Baking" Cookbook.

Gingerbread Cookies:
3/4 cup unsalted butter, at room temperature
3/4 cup firmly packed light brown sugar
1/4 cup molasses
2 egg yolks
2 1/3 cups unbleached all-purpose flour
2 teaspoons ground cinnamon
2 teaspoons ground ginger
1 teaspoon ground allspice
1/2 teaspoon baking soda
1/4 teaspoon ground cloves
1/4 teaspoon salt

Beat butter, sugar, molasses until fluffy. Beat in egg yolks. Sift dry ingredients directly into butter mixture and beat until well combined. Wrap in plastic wrap and refrigerate overnight. Preheat oven to 375 degrees F. Line baking sheets with parchment paper. Remove dough and roll it out 1/4 inches thick. Cut out gingerbread people with cookie cutters. Bake until cookies turn golden brown on the edges, about 10 minutes. Transfer to racks and let cool. Decorate the cooled cookies with white icing or royal icing.